Updating the app stores
Updating the content
Product: Create the ticket
-
Create a new ticket for the app store updates.
-
Include content for the "What's New" section of the app stores.
-
If content changes are needed for the app store images themselves, include the necessary updates.
-
Request screenshots from engineering in the following sizes:
-
iPhone: 360 x 760 px (iOS Simulator or device using a 6.5” device such as iPhone 13 or 14)
-
iPad: 1040 x 1504 px (iOS Simulator or device using iPad Pro 12.9”)
-
Android: 180 x 380 px (Android Emulator or device using Pixel 4)
-
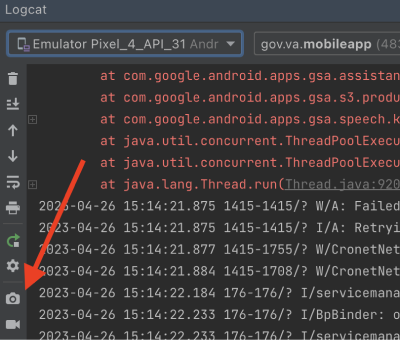
Make sure the corners are not rounded. Taking a screenshot using the camera icon in Android Emulator will result in rounded corners. To bypass this:
- Go to View > Tool Windows > Logcat
- In the panel that pops up, click the camera icon in the left toolbar to take a screenshot without rounded corners
-
-
Engineering should then add the screenshots to Google Drive so that the designer can access them and the link should be added to the ticket.
-
-
Assign the ticket to a designer (typically Brea does the app store image updates)
Designer: Update the app store images
- Create a branch in the Figma file
- Update the screenshots on the “Step 1: Update screenshots” page
- Update images on the “Step 2: Update images” page according to the following image requirements:
| App Store | Quantity | Category | Image size | Naming convention |
|---|---|---|---|---|
| iOS | 10 | iPhone 5.5 | 1242 x 2208 px | iphone55-screen-1.png |
| iPhone 6.7 | 1290 x 2796 px | iphone65-screen-1.png | ||
| iPad 12.9 | 2048 x 2732 px | ipadPro129-screen-1.png | ||
| iPad 2nd gen | 2048 x 2732 px | ipadPro2ndGen-screen-1.png | ||
| Android | 8 | Images | 320 x 569 px | 1_en-US.png |
| 1 | Feature graphic | 1024 x 500 px | featureGraphic.png |
-
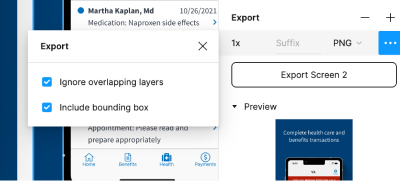
Export the images.
- Important: Verify that both “ignore overlapping layers” and “include bounding box” are checked before exporting.
- For iOS, images must not include a transparency/alpha layer. Figma does not have a way to remove this from your PNG export, but the Export Opaque PNG plugin can be installed and used. Alternatively, you can follow these steps using the Preview app on Mac.
- For Android, images should be exported at 4x and can be up to 8 MB per screen. The
- The feature graphic should be exported at 1x and can be up to 1 MB.
- Frames in Figma are currently named according to the app store requirements.
-
Optimize the images using Imageoptim.
-
Upload the images to the Google Drive.
-
In the Github ticket, alert product that the images are located in the Google Drive and are ready for review.
-
After product approval, the branch can be merged into the main Figma file.
Product: Publish the content
All changes should be made to the files in the repo and not directly to the stores. Android files should be in the folders inside the images filter – not in the images directory itself.
VA App Store
- Product should send the updated copy and images to the VA App Store team via email.
- Current contacts:
- Treva Lutes – treva.lutes@va.gov
- Donna Rodriguez – donna.rodriguez@va.gov
- Gwen McMillian – gwendolyn.mcmillian@va.gov
- Current contacts:
What’s New Content
Android (Play Store)
- Go to GitHub using your web browser.
- Under the <>Code tab, go to the develop branch and search for the latest release version: release/v1.X.0 (it’s usually at the bottom).
- Go to the VAMobile folder and then select the ‘android’ folder.
- Select the ‘fastlane’ folder.
- Go to metadata/android/en-US folder.
- Go to changelogs folder and then select the default.txt file.
- To edit the "What’s New" content, select the edit icon.
- Remove the old text and replace it with the new "What’s New" content.
- Select "Commit Changes".
- Add a brief description highlighting what has been changed (i.e. Updated android what’s new content) under the "Commit Changes" title.
- If this is your first change for the release branch continue with step 12-15.
- If this is not your first change being added to the branch, then follow steps 16-17.
- Select option ‘Create a new branch for this commit and start a pull request’.
- Update the branch name (try to be as descriptive as possible – i.e update-store-for-release-1.X.0)
- Select "Propose Changes" and you will be taken to the Pull Request screen.
- Update the title with what change has been made (i.e. Update What’s New Content)
- Update the description to include details of what changes are being made (i.e Updating What’s New Content)
- Select "Create pull request" button. Now, the pull request is tied to the release branch.
iOS (App Store)
- Go to GitHub using your web browser.
- Under <>Code go to the develop branch and search for the branch previously created above in step 12 (it will have the release number in it).
- Go to the VAMobile folder and then select the ‘ios’ folder.
- Select the ‘fastlane’ folder.
- Select the ‘metadata’ folder.
- Select ‘en-US’ folder and then select the release_notes.txt file.
- To edit the "What’s New" content, select the edit icon.
- Remove the old content and replace it with the new "What’s New" content.
- Select "Commit Changes" and update the title.
- Add a brief description highlighting what has been changed (i.e. Update ios store what’s new content).
- Select "Commit change directly to the branch" button. The branch that you previously created in step 12 above should be displayed (update-store-for-release 1.x.0).
- Select "Commit Changes" and the change should be complete.
Validating your work
- Go to ‘Pull Request’ in the top navigation bar.
- You should see the pull request that was created (i.e. Update store content) and select it.
- Select <> Commits and you should see a list of the 2 commits that you made.
- Select ‘File changed’ on the nav bar to verify the changes. You will see the old text highlighted in red and the new changes highlighted in green.
Feature Description
iOS (App Store)
- Go to GitHub using your web browser.
- Under <>Code, go to the develop branch and search for the branch previously created above in step 12.
- Go to the VAMobile folder and then select the ‘ios’ folder.
- Select the ‘fastlane’ folder.
- Select the ‘metadata’ folder.
- Select ‘en-US’ folder and then select ’description.txt’.
- Select the edit icon to edit ’description.txt’.
- Add or modify description text.
- Select "Commit Changes" and update the title.
- Add a brief description highlighting what has been changed (i.e. Update description text). You can add additional details in the optional extended description, as well.
- Select "Commit change directly to the branch" button. The branch that you previously created in step 12 above should be displayed (update-store-for-release 1.x.0).
- Select "Commit Changes" and the change should be completed.
Android (Play Store)
- Go to GitHub using your web browser
- Under <>Code, go to the develop branch and search for the branch previously created above in step 12.
- Go to the VAMobile folder and then select the ‘android’ folder.
- Select the ‘fastlane’ folder.
- Select the ‘metadata/android/en-US’ folder.
- Select ‘full_description.txt’.
- Select the edit icon to edit ’description.txt’.
- Add or modify description text.
- Go down to "Commit Changes" and update the title.
- Add a brief description highlighting what has been changed (i.e. Update description text). You can add additional details in the optional extended description, as well.
- Select "Commit change directly to the branch" button. The branch that you previously created in step 12 above should be displayed (update-store-for-release 1.x.0).