How to build screens in Figma
A guide to building working files and shipped files
Step 1: Create your frame
- Create a frame at 360 x 760.
- In the assets panel, search “template” and drag the template into the frame.
- After adding the template to the frame, you can then select that template layer, which will give you options in the design panel on the right-hand side of the screen. In this panel, you can select the category (home, health, benefits, payments) and template type (feature, subtask, etc.).

Step 2: Add your content
To create and link your content to your template, we recommend following the steps below:
- From the assets panel, drag the content area component onto the page.
- Detach the instance and remove the content area layer (it’s just a placeholder).
- Add your components to the content area (they can all be customized by selecting the component’s layer in the design panel on the right-hand side of the screen).
- After you have completed adding your components, we recommend that you add autolayout to the main “content area (default)” component to help keep consistent spacing and alignment. Then, create a new component and give your content a unique name.
- In the main frame that houses your template, select the template’s layer. Scroll down to “Main Content” and then select your content component. This will replace the placeholder content with the content that you just created.
Note: You can always go back and make changes to the content component that you created. Also, there may be additional ways to create a content component, such as by starting from scratch and creating a new component.
Step 3: Create dark mode versions
After you’ve created all of the shipped screens in light mode, you may need to create dark mode versions of your screens.
- To create dark mode versions, select all of your light mode layers and duplicate them (on Mac, you can hold down option and click + drag to duplicate). We recommend visually grouping light mode versions together and dark mode versions together.
- We recommend adding light and/or dark mode to each of your frame names within your shipped file. For example, you may name one of your light mode frames “Profile / Landing / Light” and the dark mode frames “Profile / Landing / Dark”.
- After you have duplicated your light mode versions, you’ll need to change the color mode. You can adjust the mode by clicking the change variable mode icon and switching each library to "Dark" (see screenshot below).
![]()
- You may also need to update some of your components within your content area to dark mode. The easiest way to do this is to select each component layer within the “Layers” panel on the left (you may have to click the option to “See All Layers”). You’ll want to look for the “Content” layer and may have to go several layers deep within this layer to find your individual component layers. Then, select “Dark” in the mode area within the design panel.
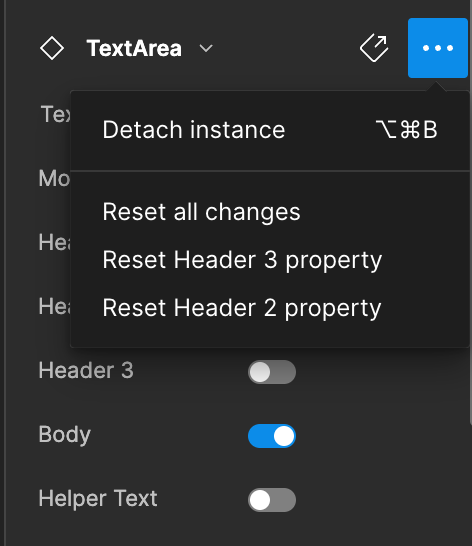
- Figma is not without glitches and will sometimes return your component to its default settings when switching the color mode. When this happens, sometimes resetting the component will fix it. You can do this by clicking the icon with 3 dots (“...”) in the design panel. Click the icon and select “Reset all changes” (see screenshot below). If this doesn’t work, you may have to update each component manually.
- When using the “Text Area” and “Default List” components, you may have to update each row within the component to dark mode vs. updating the entire component at one time. This will often prevent the content from restoring to default.