How to create a Fortify log file
Question
How do I create a Fortify log file with debugging turned on?
Answer
To create the log file with debugging turned on, you will need to use the -debug and -logfile command-line options for sourceanalyzer, Audit Workbench, the Fortify Scan Wizard, or the Fortify IDE plugin, and include a path where you would like the file(s) saved. You can also add the -verbose argument for more detailed log file output. For resolving scan errors, the developer should generate separate log files for the translation and scan phases of the scan as shown below.
Audit Workbench
In Audit Workbench, the debug command line arguments can be added to the translation and scan phases within the Scan Wizard:
-
Select Advanced Scan in Audit Workbench:

-
Enter information for the project, including source code directory, classpath, and output file location as usual, then click “Next” to advance to the command line options
-
For both the Tranlation and Scan phases, add the following arguments to the list of command-line options generated by Fortify, and specify a path where you want the log files to be saved, with different filenames for the scan and translation logs:
"-debug""-logfile""\path\to\logfile\filename.log"
From the command-line or batch file
If you are running from the command-line or from a batch file, you can add the same options for both the translate and scan phases, and also specify a path for the generated log files. For example:
// Translation phase:
sourceanalyzer -b <build-id> -debug -logfile C:/path/to/translation.log <source-files>
// Scan phase:
sourceanalyzer -b <build-id> -debug -logfile C:/path/to/scan.log -scan -f scanfile.fpr
Fortify IDE Plugin
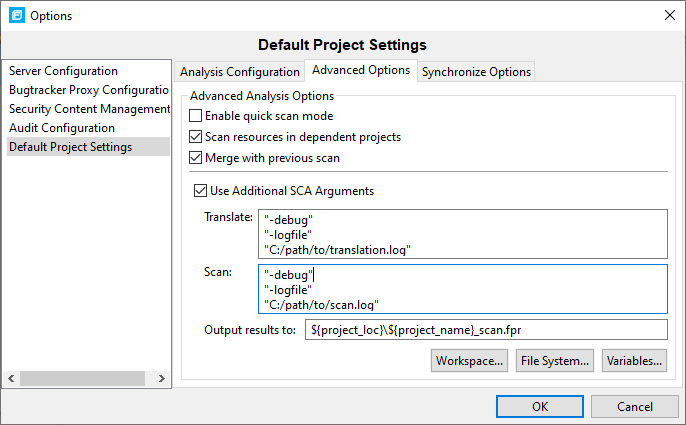
If you are running the scan from an IDE plugin, you can set these options in the options dialog:
- Select the Fortify > Options menu
- Select “Project Settings” or “Default Project Settings” on the left menu
- Click on the “Advanced Scan Options” tab
-
Select the “Use additional SCA arguments” checkbox
Enter the
-debug,-logfile, and\path\to\logfile\filename.logoptions in both the “Translate” and “Scan” text boxes, with different names for each log fileFor example:
Note that for some versions of VS, the options will be all on one line without the double-quotes.
The resulting log files will be placed in the location specified.
Fortify Scan Wizard
A Fortify Scan Wizard script can be modified to generate a debug log file as follows:
First the “DEBUG” flag should be set to true near the top of the file:
set DEBUG=true
Then, in the Translation section of the file (under “echo Translating files”), add the “-logfile filename.log” command:
echo Translating files %SOURCEANALYZER% %MEMORY% %LAUNCHERSWITCHES% -b %BUILDID%
-logfile translation.log @%ARGFILE%
Similarly, in the Scan section of the file (under “echo Starting scan”), add the same “-logfile” command with a different filename:
echo Starting scan%SOURCEANALYZER% %MEMORY% %LAUNCHERSWITCHES% -b %BUILDID%
-scan -logfile scan.log -f %FPR%
References
- OpenText Fortify Static Code Analyzer User Guide - Chapter 13: Command Line Interface