How to view Remediation Effort for findings in AWB
Question
How do I view the remediation effort assigned by Fortify for the findings reported in my scan?
Answer
There are two methods that can be used to view remediation effort values assigned by Fortify SCA, either in the Details tab for individual findings in Audit Workbench, or by creating filters to view the values for all findings. Both methods are described below.
Method 1 - Fortify Audit Workbench Details Tab
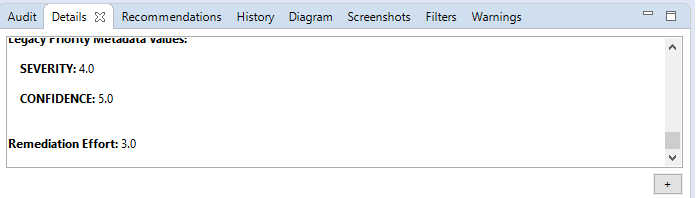
When viewing individual findings in Audit Workbench, the Details tab contains additional information about the finding from Fortify SCA. By scrolling down to the bottom of the Details pane, the Remediation Effort value can be seen:
Method 2 - Using Fortify Audit Workbench Filters
A Filter Set can be defined with Filters to group and display the findings associated with the different remediation efforts defined by Fortify SCA.
Chapter 4 of the Micro Focus Security Fortify Audit Workbench User Guide covers Scan Results and it contains a section on Configuring Custom Filter Sets and Filters.
Follow the steps in the Audit Workbench User Guide on Creating a New Filter Set:
- Select Tools > Project Configuration.
- Click the Filter Sets tab.
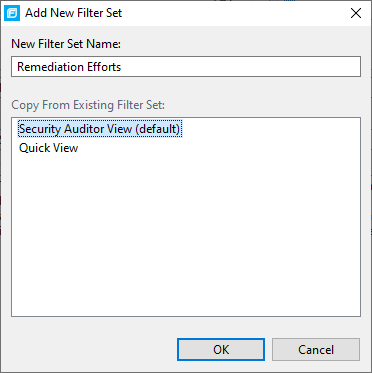
- Next to Filter Sets, click Add Filter Set (‘+’ button) - The Create New Filter Set dialog box opens.
- Type a name for the new filter set (Remediation Efforts)
- Select an existing filter set to copy (Use Security Auditor View so all issues are included)
- Click OK.
A new filter set with the same folders, visibility filters, and folder filters as the copied filter set is created.
Next, follow the steps in the Audit Workbench User Guide on Creating a Filter from the Issue Auditing View:
Use the Filters tab in the Issue Auditing view to create folder filters for the remediation efforts.
To create a new filter on the Filters tab:
-
From the Filter Set list (top left of Audit Workbench, below the Summary button), select the filter set created above (Remediation Efforts).
-
Click the Filters tab in the Issue Auditing view:

-
Right-click Folder Filters, and then select Create New Filter…*
-
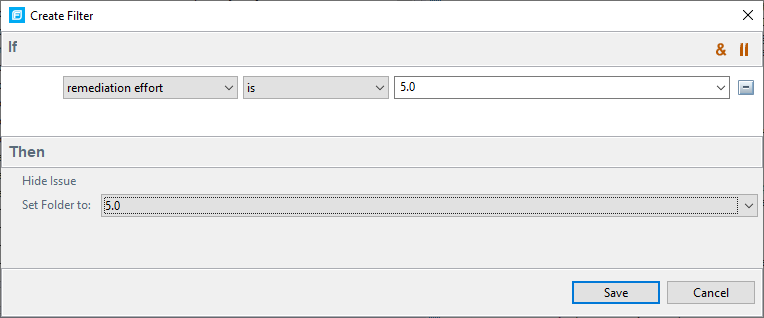
From the first list, select the attribute, remediation effort
-
From the second list, select is.
-
From the third list, select one of the remediation effort levels (only the remediation effort levels that have corresponding findings in the FPR will be shown).
-
In the Then section, select Set Folder to: and select Other Folder…
-
Enter a Name to match the remediation effort level chosen in step 6 and choose a unique color for the folder.
-
Click Save.
The new filter is displayed at the end of the list. Folder filters are applied in order and the issue is directed to the last folder filter it matches in the list. Issues that match the remediation effort selected will appear in the created folder.
Create a filter for each remediation effort level listed in Step 6 to show all issues reported under their corresponding remediation effort (Repeat steps 3 through 9 for each remediation effort level listed)
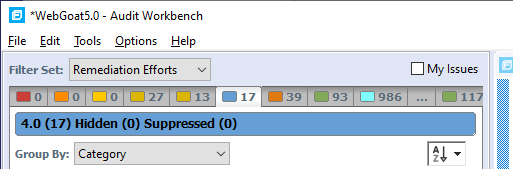
The issues will not be shown in the Fortify Priority Order as originally shown, but will instead be shown under the remediation effort level folders created. Note that selecting the Security Auditor View as the Filter Set shows the findings in the original Fortify Priority Order folders.
The template with the Remediation Efforts Filter Set and Folders created can be exported for use with other scans if desired.
From Tools > Project Configuration, select Export to save the template.
Select Import to use the template with other scan results loaded into Audit Workbench.
If the FPR is saved with the Remediation Efforts filter set defined, when the FPR is re-opened in Audit Workbench, the Remediation Efforts filter set will still be available for view.