How to Validate a V&V secure code review package
Question
How do I validate my secure code review package to ensure that it will pass its V&V review?
Answer
The OIS Software Assurance Office performs validation checks on the materials submitted for V&V review. The remainder of this answer will detail how these checks may be performed, though they are not the only means for performing these checks.
If your secure code review package doesn’t satisfy one or more of these checks, either correct the issue before submitting the project for review or provide a document with justifications for the discrepancies (e.g., that a directory with unscanned code is not used in the production environment). The review team will take this additional information into account when performing the review which can result in a faster, more accurate review.
See the Scan Issue Technical Notes for common scan issues encountered by the VA Software Assurance Office and how to detect and resolve them.
The steps in the following sectiosn should be followed when performing a V&V review:
Check developer-provided scans file for matching source code
This validation check consists of confirming that the delivered source code matches the code that was scanned by Fortify. This ensures that all the source code has been scanned and the same versions of the files that were scanned are the versions that are to be deployed into production. The following steps may be performed to compare the two sets of code:
- Extract the code from the FPR file - this will correspond to the code files that were scanned
- Open the FPR in Audit Workbench
- Select the Tools -> Extract Source Code menu item
- Select the folder to export the code to
- Compare the extracted code to the source code distribution supplied as part of the code review package. You can use WinMerge, diff, or other appropriate application.
- Differences in source code files indicate that the code sets are different
- Look for code files that are in the distribution files that are not in the scanned files. Make sure SQL files, XML configuration files, Infrastructure as Code files, and such are included in the scan. Build files, libraries, images, and other supporting files may be ignored.
- Look for code files in the scanned files that are not in the distribution package. Essentially, what is scanned by Fortify should match what is delivered to the Software Assurance team, and what is planned to be delivered to production. When source code files are scanned, but not included in the distribution package, it’s not clear if findings associated with the extra files need to be analyzed and remediated, or if the files were simply not part of the production application.
-
Differences may be the result of scanning the wrong set of code, scanning issues, presence of test or debug code, etc. A rescan may be required to resolve issues.
- The following tech notes have more information on common scan issues resulting from source code discrepancies:
Check developer-provided scan file for scan errors/warnings.
This validation check consists of reviewing the FPR file for any anomalies in the scan. When running the scan there may have been errors or warnings reported by the static analysis tool that affected the quality or completeness of the scan that may have been overlooked.
- The following technical note describes how to check for scan errors: How to view error messages reported by Fortify
- If any errors were reported, they should be resolved before submitting the code for V&V review. The technical note Troubleshooting Fortify Errors provides information on resolving common scan errors.
- The following tech note has more information on the scan issue resulting from Fortify errors:
Check developer-provided scan file for residual findings.
This validation check ensures that the results of the scan conform to the VA’s requirements. This check is performed by opening the FPR file in Audit Workbench and looking at the issues reported in each of the critical, high, medium, and low categories. The results presented there are subjected to the following checks
-
First ensure that Audit Workbench is displaying all the issues reported by the scan. Look for the “Filter Set” drop down box in the upper left hand corner of Audit Workbench as shown in the following image:
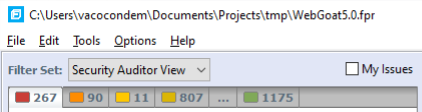
- The Filter Set should be set to “Security Auditor View.” Other values only display a subset of the reported issues.
- If the FPR file contains any critical or high issues, these must be marked as “Not an Issue” with comments explaining why they are false positives or mitigated in the code.
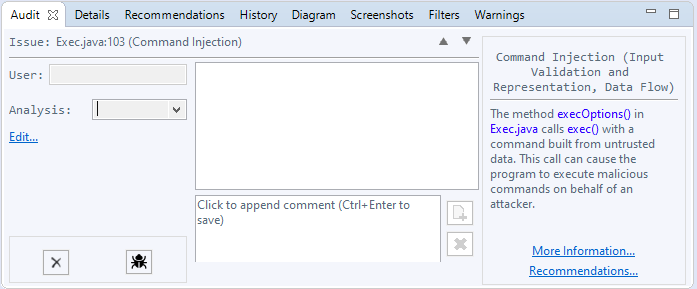
- Comments should be included in the auditing panel as shown below:
- Set the appropriate value in the Analysis drop down box (indicated by the red arrow). “Not an Issue” should be used to indicate a false positive.
- Enter a comment in the lower text box that says “Click to append comment” in the image below.
- Commit the comment by pressing “CTRL-ENTER” or clicking the add icon indicated by the paper with the ‘+’ in the image below.
-
Note that multiple instances of an issue may be selected to apply the same comment to all the selected instances.
- The following tech note has more information about residual findings:
Check developer-provided scan file for suppression of issues
This validation check consists of reviewing the FPR file to ensure that issues reported by Fortify have not been suppressed or hidden. Instead of suppressing issues, they should either be audited correctly or handled with custom rules as appropriate. If they are false positives, they should be marked as “Not an Issue” with an appropriate explanation in the comments section. Suppressed and hidden issues may be displayed by:
- Select the menu option Options -> Show Suppressed Issues
- Select the menu option Options -> Show Hidden Issues
- Alternatively, these may be enabled by selecting Options -> Options from the menu and selecting these options from the Interface Preferences tab of the Options dialog window.
-
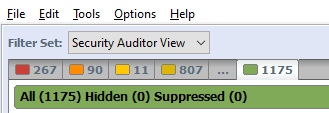
Click on the green tab on the Issues Panel to display all the issues reported by Fortify. The tab title will now display the total number of issues as well as the number of Hidden and Suppressed Issues as shown in the following image.
- To resolve this issue, remove any filters that are hiding issues, and unsuppress any suppressed findings. Also confirm that Fortify’s default scan settings are used to ensure it does not automatically hide any issues.
- The following tech note has more information about scan issues resulting from hidden or suppressed findings:
Check developer-provided custom rule files, if provided
Custom rule files may be used by Fortify to provide additional analysis, provide information on source, sink, and cleanse functions, and otherwise modify the analysis. If custom rules have been used, the custom rule file should be delivered with the V&V code review package. The validation team will then review the custom rule file. This review will include, but is not limited to:
- No custom rules disable built-in Fortify rules
- Functions specified as validation or cleanse functions perform the expected task
- Rules do not increase false negatives
- Other validations as appropriate for the types of custom rules provided
- The following tech note has more information about what must be included in the artifacts delivered when using custom rulepacks:
- The following tech note has more information about scan issues related to not using the default rulepacks:
Perform additional supporting analysis, as needed
This validation check consists of performing additional supporting analysis for items that may have been identified during the course of the validation for a particular application. These checks include, but are not limited to:
- All explanations for false positives are valid. The review team will report issues where they disagree with the “Not an Issue” designation or they don’t believe enough information was provided to determine whether or not it is a false positive.
- Note that the more information that you can provide for false positives the better. The reviewer doesn’t know your code or have time to fully understand it. Providing explanations of why the issue is a false positive with detailed explanations, filenames and line numbers where the issue is handled, etc. will make for a faster and more accurate review of these findings.
- Current versions of Fortify and its Rulepacks were used to perform the scan
- From the Project Summary page, select the Analysis Information tab and the Security Content sub-tab. This will show the versions of the rulepacks used for the scan. These version numbers can be compared to the most recent version of the rulepacks.
- The latest version of Fortify and the rulepacks can always be found on Teams:
- The following tech notes have more information about scan issues resulting from using old versions of Fortify or the rulepacks: